

Thanks to all the great feedback in the Mater Amabilis facebook group. It seems appropriate to share all of the details on my Charlotte Mason planner, since I spent so long figuring it all out!! So many people have helped me get started in this journey, now it's my turn.
A little about us...
My twin girls are 6 years old. We are moving into MA Year 1B / AO Year 1 / Form I. We use a combination of Mater Amabilis, Ambleside Online, and for history I love all of the podcasts over at A Delectable Education. The ladies who write at the following blogs have truly inspired me... Wildflowers & Marbles, Sage Parnassus, Living Soul Deep, Joyous Lessons, Moments With Mother Culture, and A Delectable Education! I am beyond thankful to the curriculum writers at Mater Amabilis and the advisory at Ambleside Online.
That being said I couldn't find a planner that was an exact fit, and so I knew I had to create my own. Through lots of prayers, research, and energy this is what I came up with. I wasn't planning on sharing, but I felt compelled to, and now here I am typing up this how to guide. I really hope it helps or inspires you to create your own planner, if like me you haven't already found the perfect fit.
I just took some time to flip through the planner and show you each section that I have in there.
Step By Step:
Step 1: Nail down your schedule
I spent lots of time here and feel what I have is close to what CM would have done in her schools. My biggest aim was to have, as she recommended, the subjects alternate daily so the students would never have the same exact day M-F, but how do I keep track of that with so many subjects?! We have this beautiful feast to spread but we have to keep track of it too. With the weekly schedule from MA & AO before me, and a few other resources for content, I began to form our weekly/daily schedule by looking at Charlotte Mason's daily time-tables. After that I spent lots of time looking at Form I and Year 1B schedules online from various sources. Google was my BFF for a while. Then I finished by taking some time to read and apply what Charlotte Mason presents in her programmes that accompany the times-tables. Those were the missing links, for me, in building our daily schedule.
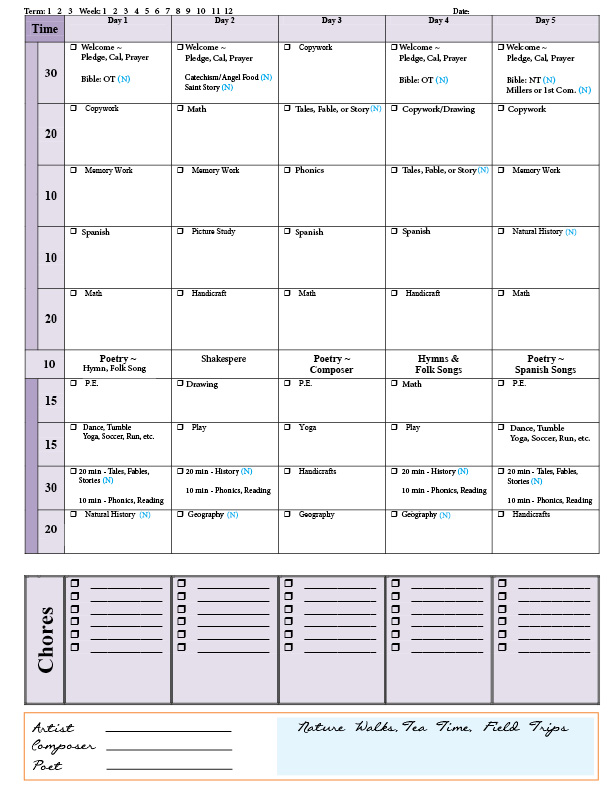 |
| This is a general layout of our week. A snapshot of subjects. I plan to write in the books being covered on this page, but save page numbers and more detailed information for the daily schedule. I am going to copy what MA or AO has laid out for the 36 week lesson plan (including any adjustments/additions I've personally made) onto these pages. |
This part of the planning was not about what books to use and cover each week. Mater Amabilis and Ambleside Online, along with some recommendations from a few seasoned CM moms (see blog list above), had that knocked out for me. Thank you! This part of the process was about how to actually organize it all - daily. Kind of like putting the puzzle together. I had all the pieces, just needed to make them fit logically and most like Charlotte did. That's why I need a planner, so that my day flows and I don't have to think about it.
For this part you can copy what I have created, create your own, or purchase BLANK files and edit them yourself. In the Etsy bundle I have included the blank files for weekly, daily, front, and back cover for $10. You can download them right away. One of my favorite and easiest ways to edit is to take a JPEG file PLACE it in a google drawing (see google docs online and find drawings) and edit! You can place text boxes wherever you want all over the JPEG!! It's super easy. When you're done save it as a PDF for highest quality and then PRINT. That's it!! You could also just print the blank files to add to your planner and write everything in throughout the year. Last you could use the files in another design program like Adobe InDesign to create your personal schedule. I'm sure there are other ways too!!

 |
| Daily has larger blocks on the left to write in more detailed information. Page numbers, what was actually covered, etc. Extras, etc. |

Step 2: Print your weekly and daily schedules
Once you've figured all that out....Print 36 weekly files. I color coded these and used card stock versus regular weight paper. I printed 12 pink for 1st term, 12 green for 2nd term, and 12 blue for 3rd term. Print 36 Mondays, 36 Tuesdays, 36 Wednesdays, 36 Thursdays, and 36 Fridays. Print back and front when you can to save space and paper. I printed these in black and white (you could print in color) on white regular stock paper. This planner is 8.5x11 in size so that I could use my at home printer for some of the printing. I ended up printing the bulk (daily schedule) at my print shop. Cost was about $12. I printed the weekly pages at home. Set all of this aside. Now you have the bulk of your planner complete - weekly/daily schedules for all 36 weeks! You may notice I don't have a daily anything for Saturdays and Sundays. That may be something you'd like to include. I am just planning on jotting down weekend events on my monthly calendar.
Step 2: Collect the other files that will make up your planner.
A. Calendars
I printed an academic year overview and vertical monthly calendars. My year is running from August to July. You can make yours however you like. I used CalendarPedia for all of my monthly calendars. Download, save, and print the PDFs that you choose. Print them on cardstock. I chose a bright yellow to print these on. I printed these at home. set aside.
B. Meal Planning
I researched and settled on these to use. I printed them back and front in black and white. Print enough to cover each month. I also included a grocery list. I used this (should be able to use the file below) and also perforated them, so that I can just tear a list out before going shopping each week. That tool is about $3 at a craft store. 3 per page single sided (or you could double side it for more writing space). I put in two pages so I have 6 lists for each month to use.
C. Blank Monthly Dividing Pages & Tabs
I didn't use this in my current planner but probably will next year so I can place my tabs on these and open directly to the month. I was trying to cut down on as much paper as possible, since it's so thick already! But if you want to, I would just use most likely the same yellow paper, or whatever color you choose, to place in front of your monthly calendar. You will adhere the monthly tabs to these pages. I bought my monthly tabs on Etsy. There are many to choose from! I got mine from i Smooch Planner These cost about $12.
D. Front and Back Cover
Design, print in color, laminate.
I have this included with the weekly and daily files that are available for download, so I can customize it for you if you go that route.
Set all of these files aside and tabs aside.
Step 3: Assemble/order your planner.
Start with your front cover, yearly overview calendar(s), then start with your first month or blank file page. In my planner, I then put meal plans and grocery lists. Next comes the weekly overview and then M-F daily schedules. I put the correct number of weeks that followed that are school weeks for the month. You could do this however YOU like!! :) If at the end of the month there were three leftover days and two on into the next month, I just kept that as a full week together. I know at the beginning / end of a few months I may have to flip back or flip forward into the following or previous month, but I'm okay with that. If you want to try and break it up more exact that would be up to you since it's YOUR planner! Think about it and lay it out how you like. I used all 36 weeks up and my planner was done. We only officially are going to "school" for a week in December, so that's all I put after my December monthly calendar. I will use my monthly calendar to write down events and appointments. So December's calendar (the vertical one in yellow) may be a little more full but that's okay with me! I only use my daily calendars for school. That may or may not work for you. If it doesn't you could easily create a general daily page to insert where you aren't doing school. (spring break week, holidays weeks, weekend, etc.)Step 4: Bind your planner
I took my ready to bind planner to my local print shop and had them spiral bind it for about $4. You could put it in a 3 ring binder, bind it yourself, or however you want to do it.
Step 5: Enjoy and be proud of your work!!
Many blessings! ~ Amber
No comments:
Post a Comment